Saturday, February 28, 2015

Spiced Cranberry-Oat Bars

It was a cold day in February. I had a hankering for Smitten Kitchen's Cranberry Crumb Bars with Mulling Spices, but I wanted them to be more wholesome and breakfast-y so that I could eat them at any time with at least a modicum of respectability. I increased the cranberry content and added oats, flax, walnuts, and a splash of Grand Marnier. The results made for a toothsome snack that delights the tongue and sticks to the ribs. Tender oat cookie dough encases a tart, fruity filling that adds color to the wintriest of days.


for a 9 x 13 baking pan

Ingredients


Crumb


2 sticks cold butter
1 1/2 cups flour
1 1/2 cups oats
a few healthy shakes of flax (about 1/2 cup)
1 cup sugar
dash salt
1 tsp baking powder
1/2 tsp cinnamon or ginger (depending on whether you want your bars sweet or snappish)
1/4 tsp nutmeg
1/8 tsp allspice
1 egg

Filling


1/2 cup walnuts
zest from one orange
juice from half an orange
splash Grand Marnier (optional; if you don't use this, use the juice of the remaining orange half)
4 cups fresh or frozen cranberries
1/2 cup sugar
1 Tbsp cornstarch 

Process


Line your 9 x 13 baking pan with parchment paper and butter the parchment and the sides of the pan.

Preheat the oven to 350.

Filling first. Toast the walnuts in a pan until golden-brown and fragrant. Grind them or finely chop them in a food processor. Combine all the other filling ingredients, then add them to the food processor. Pulse until the cranberries are coarsely chopped. Put aside.

Now for the crumb. Combine the flour, oats, flax, sugar, salt, baking powder, and spices. Work in the butter until the mixture resembles coarse sand with deliciously fattening pebbles. I cut the butter into tablespoon-sized squares and crumble them with my fingers. Yes, the Tipsy Crumpet's fingers work their way into all her culinary creations. Sometimes, they even stay there, as in the unfortunate case of a bowl of pickles into which the tip of my index finger was hacked. . . and never found again. It was almost worth it! But no finger tips will make it into your final product, because now, all you need to do is crack the egg and massage it into the batter. Yes, it's a little awkward.

Now, pat half, or slightly more than half, of the batter into the pan. It will be a bit crumbly, but trust that it will coalesce into a shortbread-like crust during its incubation in the oven. Spoon the filling onto the batter and spread it so that it's even. Pat the rest of the batter on top.

Bake for 25 to 30 minutes, or until the top is golden brown. Cool on a rack, then cut into bars.

Sunday, February 15, 2015

Curried Veggie Pie with Buttermilk Crust

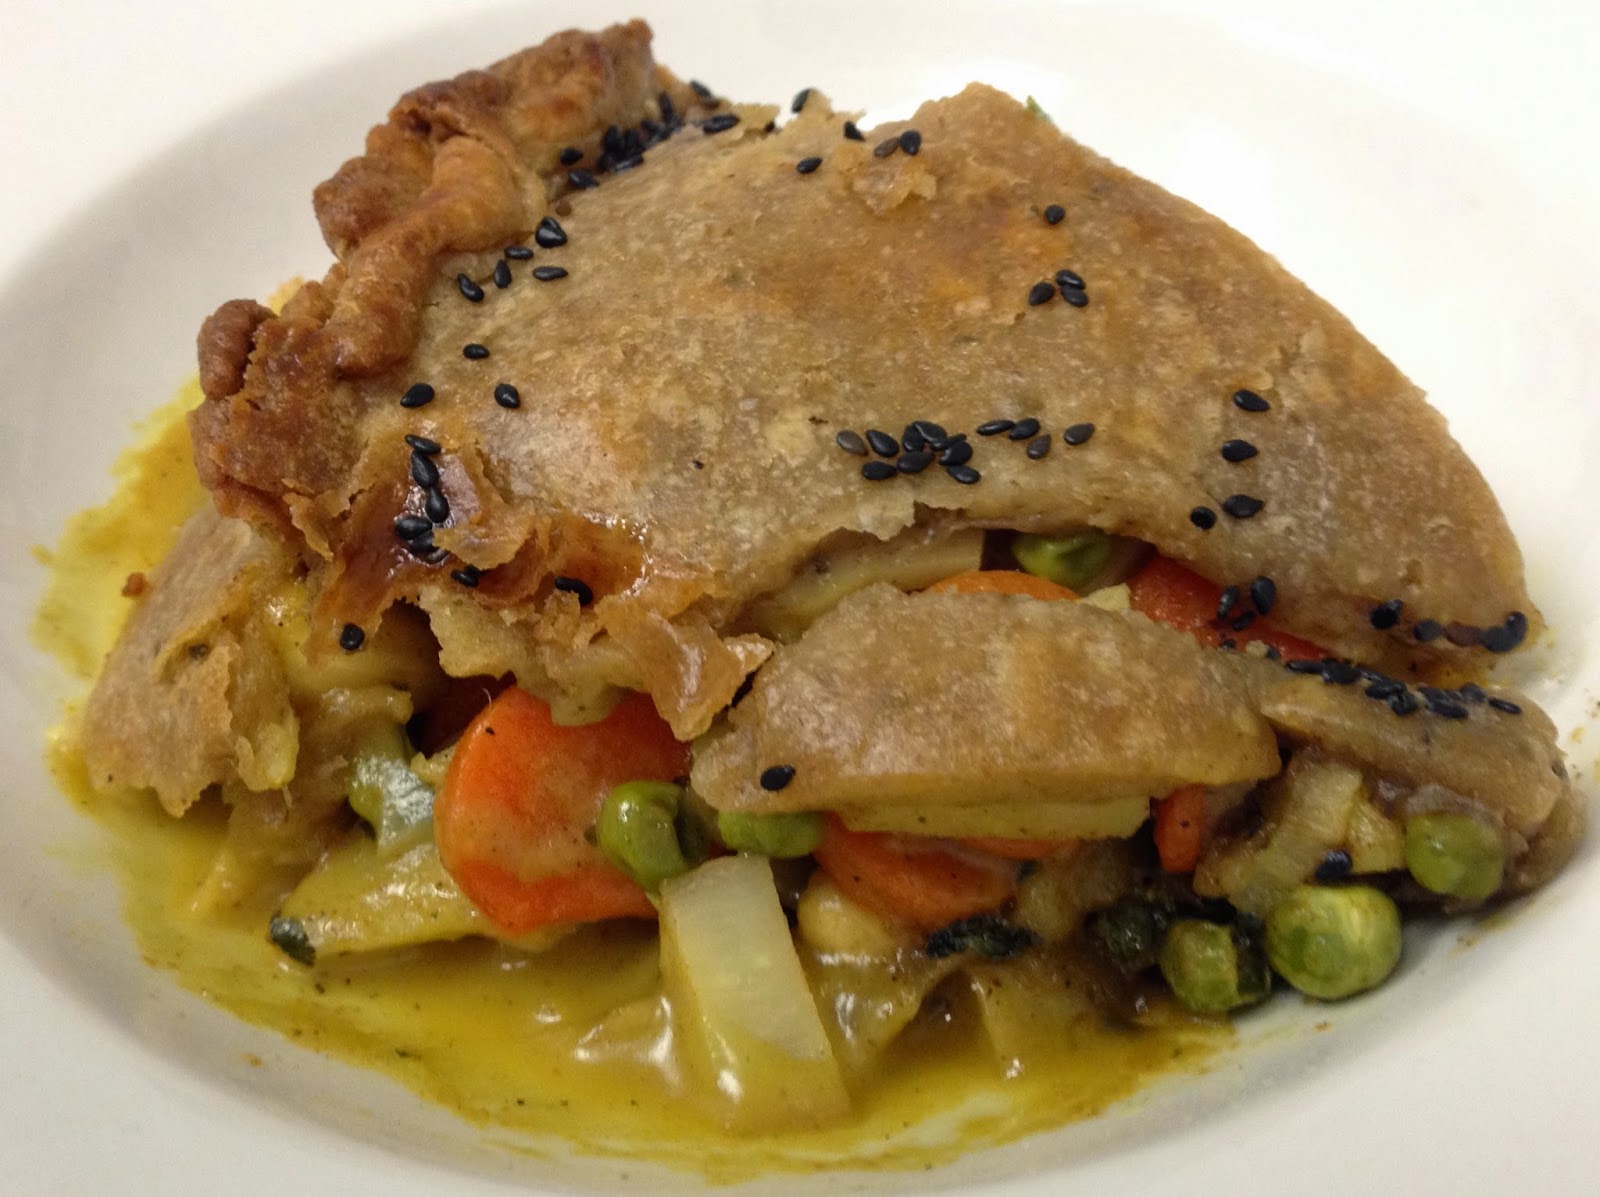
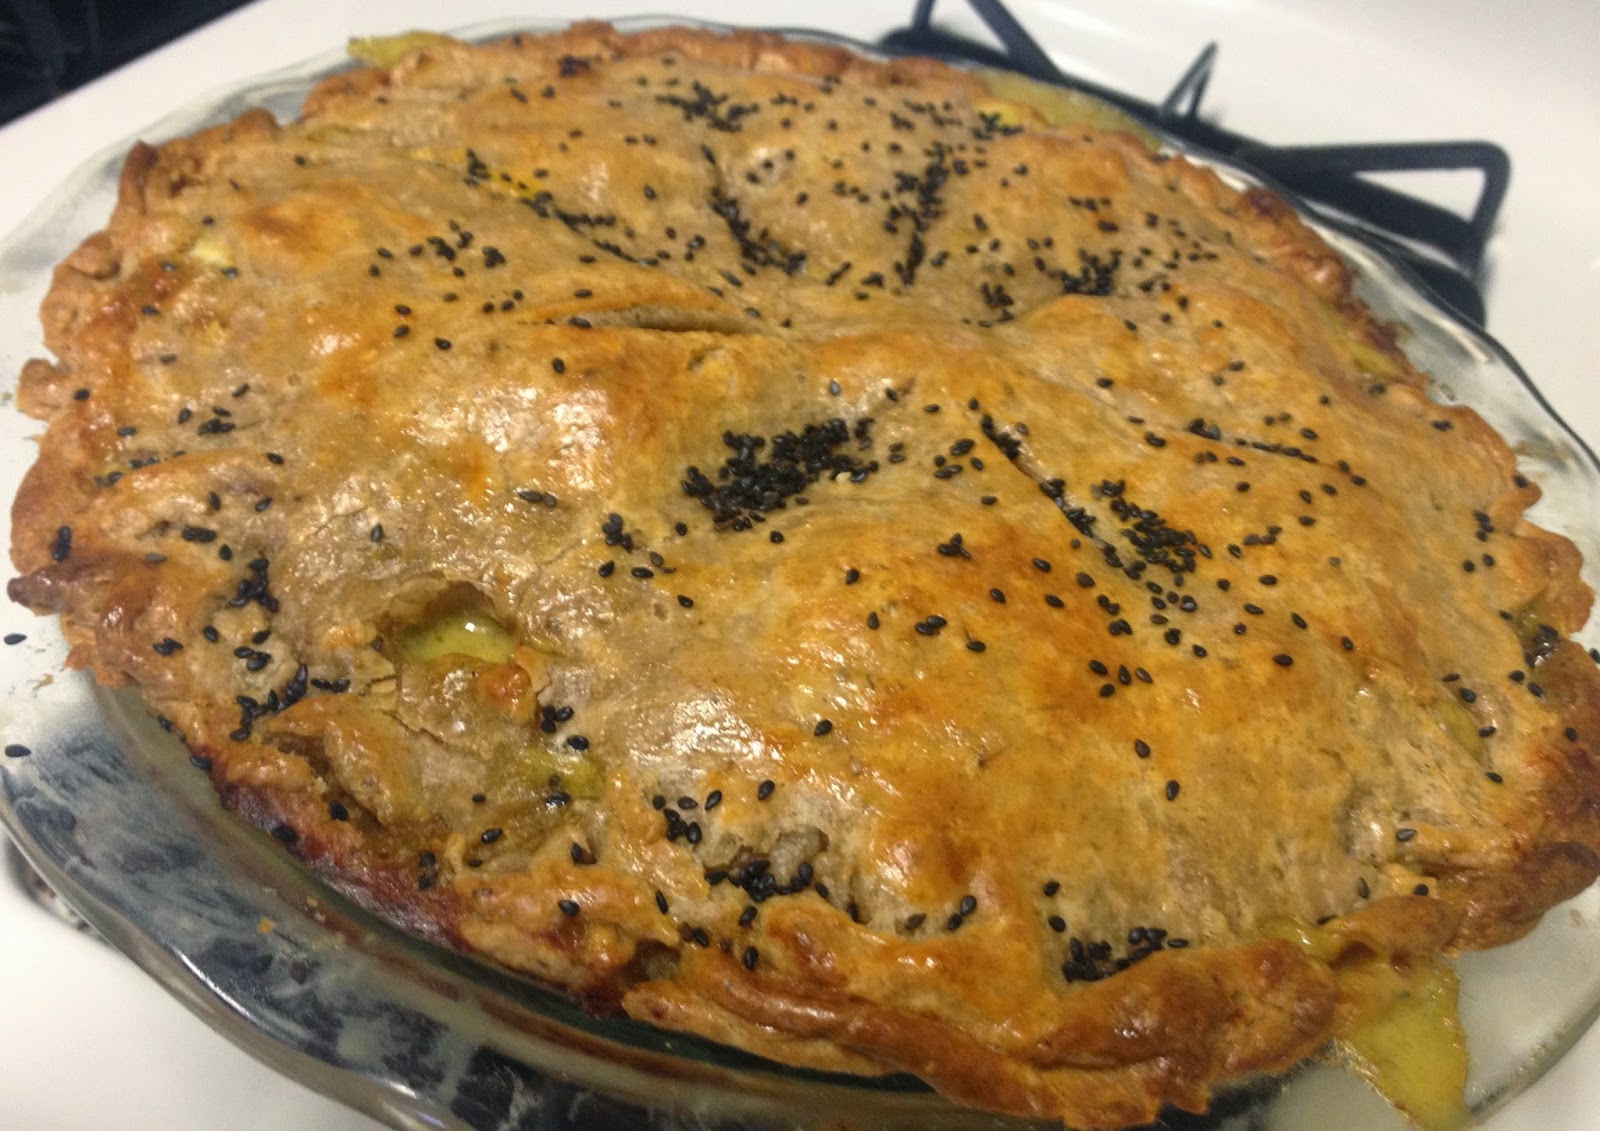
Someone gave me a bag full of parsnips. "What will I make with these?" I asked myself. My love of all foods encased in dough caused me to Google "parsnip pie"; a recipe popped up that I tweaked to my liking. The result was a deep, creamy pie full of veggies, cashews, and raisins encased in a tender crust washed in egg and sprinkled with black sesame seeds. Perfect comfort food for a cold winter's night.


for a 9.5-inch pie dish

Ingredients


Crust


1 1/4 cup white flour
1 1/4 cup whole wheat flour
salt and pepper
2 tsp dried oregano
2 sticks cold butter, sliced
splash or two cold buttermilk
egg (for the wash)
black sesame seeds (for sprinkling on top; optional)


Filling


4 parsnips, sliced thinly
4 carrots, sliced thinly
8 shallots, chopped
1 cup frozen peas
4 small golden potatoes, diced
1/3 cup cashews
1/3 cup raisins
1/3 cup cilantro, chopped
2 Tbsp butter
2 Tbsp flour
1 Tbsp curry powder
1 1/4 cups whole milk
4 oz grated sharp cheddar
salt and pepper

Process


Crust


Sift flours and add salt, pepper, and oregano. Cut in the sliced butter (I usually crumble it in my hands until the flour is uniformly coarse, with some pieces as big as peas). Add the buttermilk a splash at a time, mixing with your hands until the dough comes together in a ball. Divide the ball into two, flatten into discs, and wrap each disc in plastic. Refrigerate for at least 30 minutes (or freeze for later use).


Filling


Place parsnips, carrots, potatoes, and shallots into a large pot or Dutch oven. Cover with water and heat until the water comes to a boil. Simmer for 5 minutes then drain the veggies, saving 1 1/4 cups of the stock.

While the veggies are simmering toast the nuts on a pan over high heat until they are golden-brown (a little burnt is okay).

In your pot, melt the butter. Add the flour and curry powder and stir for two minutes. Add the veggie stock and the milk. Simmer for two minutes, stirring until the roux becomes uniformly thick. Remove from heat and add the cheese (it's okay to keep the pan on the heat for a minute or so if the cheese doesn't melt; I use Grafton cheddar, which is particularly resistant to the charms of fire). Stir until the cheese dissolves to make a thick, creamy sauce. Add salt and pepper to taste. Stir in the veggies, peas, cashews, raisins, and cilantro. Mix well. Your kitchen will be the envy of all your neighbors as they inhale the warm Spice Islands aroma.

Let the mixture sit as you roll out the pie crust.

Preheat the oven to 400. 

Place one of your discs on a large piece of parchment paper. Place another large piece of parchment paper on top. Roll out the disc until it fits in your pie pan as the bottom crust. Poke a few holes in the crust with a fork, place some pie weights on top, and bake the crust for 10-15 minutes, until it begins to turn brown.

Meanwhile, roll out the remaining disc in the same way.

Allow the crust to cool (20 minutes is okay). Pour in the filling. Place the top crust on top and pinch along the edges. Hopefully, everything fits like a dream. Refrigerate for 30 minutes to firm up the top crust.

With a large knife, slice from the center of the top crust to the middle of the crust. Do this in a circle all around the crust. You'll have 6-8 slices radiating from the center of the crust to its middle. It will look fancy and delicious, like a pie in a stock photo. Beat the egg and brush it on top of the crust (I use my hands; the Tipsy Crumpet has no pastry brush). Sprinkle liberally with black sesame seeds. Your pie looks stunning!

Place the pie in the oven, but wait! Be sure there's a layer of aluminum foil on the bottom rack so that you don't have any burning pools of curry smoking up your kitchen as the pie begins to bubble. Bake for 25-30 minutes, until the crust is golden brown and the curry simmering beneath it. If you've refrigerated the pie longer than 30 minutes (you can leave it in the refrigerator overnight), bake for 40 minutes.

Remove and dig in!


Notes


  • You can use any combination of veggies you like for this recipe. Next time, I'm going to sub 1 cup each of chopped cabbage, small broccoli florets, and small cauliflower florets for the parsnips. The parsnips tasted better to me over time (this pie ages well and will taste just as good, if not better, five days after baking), but at first, their sweetness seemed to clash with the savoriness of the other veggies. Green beans sliced into manageable pieces would also be killer in this pie.
  • I used to enjoy a similar pie at Sally Lunn's, an English tea shop in Princeton, NJ that has since closed. I added the raisins in homage to Lunn's. 
  • You could easily make this pie vegan by subbing coconut milk for the regular milk; in fact, this might work even better with the curry. I didn't taste the cheese at all after baking, so you could probably use another Tbsp of flour as a substitute. 

Verdict


5 stars. This is wholesome and winsome, with flavors to die for. The crust perfectly complements the spiced veggies in their curry cream, and a small slice goes a long way. This is a winter dinner to last all week.

Thursday, February 12, 2015

Bittersweet Nutella Cake with Frangelico

A party for a European friend. . . what to make? Europeans love chocolate. Europeans love hazelnuts. Europeans love boozing it up in style. One of my favorite candy bars is Ritter-Sport's whole hazelnuts in dark chocolate. And so this cake I'd been dying to make for months sashayed to the top of my recipe pile, and I'm very glad it did. The cake has no sugar and no flour, but you'll never miss those ingredients because it engulfs an entire tub of Nutella, has one delicious cup of ground hazelnuts and one fragrant cup of toasted whole nuts, and uses an obscene amount of high-quality chocolate. It is sprinkled liberally with Frangelico when still warm so that the liqueur infuses the body of the cake and renders it lusciously moist. All of a sudden, Americans don't look so classless after all!


lightly adapted from Nigella Lawson's Nutella cake

Ingredients


Cake


6 eggs, separated
1 pinch salt
9 Tbsp butter, softened
13-oz jar of Nutella
1 Tbsp Frangelico (hazelnut liqueur)
1 cup hazelnuts, finely ground into meal
4 oz bittersweet chocolate (dark is good--70 percent isn't too bitter for this recipe)

Ganache and Topping


1 cup whole hazelnuts
1/2 cup heavy cream
1 Tbsp Frangelico
5 oz bittersweet chocolate

Process


Preheat the oven to 350.

In a double boiler or rude approximation (pan within a larger pan in which water boils), melt the chocolate. Remove from heat when almost melted, stir until melted, and allow to cool.

Beat the egg whites and salt until the whites are stiff but still wet.

In a separate bowl, combine the yolks, butter, Nutella, Frangelico, and ground hazelnuts. Whisk until velvety smooth. Add a spoonful of the egg whites, and then add the rest of the egg whites gently, one-third at a time.

Liberally butter a 9-inch springform pan. Pour in the batter and bake for 30-40 minutes. The center of the cake will still be wobbly, but the cake will smell done (and heavenly), and the sides will have begun to pull away. Place the cake, still in pan, on a rack to cool. Poke holes in the cake with a toothpick or skewer. Sprinkle Frangelico on top (or pour some into your cupped hand and pat it onto the cake, as I awkwardly do). You may want to do this a few times to really infuse the cake.

A few hours later. . . 

Toast the whole hazelnuts in a pan over high heat. Remove from heat when the nuts smell fragrant and have begun to brown. Peel the skins if you like by rubbing the nuts in a towel. I don't mind the skins, but I remove some for a varied appearance.

Chop the chocolate, then heat the chocolate, cream, and Frangelico gently in a saucepan. Once the chocolate is melted, whisk until the consistency is uniform and the ganache shiny.

Unmold the cake, but leave the bottom of the cake pan be, as cake and bottom are codependent at this point and need one another for structural integrity. Spread the ganache over the top of the cake, letting it drip down the sides. Once the hazelnuts are fully cool, top the cake with the nuts.

Cut and serve.


Notes


  • I pulled the cake out of the oven after 35 minutes, and I think it would have been fine after 30. The cake will settle in on itself and turn into a delightfully moist solid once removed from the heat.
  • I had ganache troubles that may have stemmed from my unorthodox mixing methods: I heated a large lump of chocolate using my double-boiler method and then added the cold heavy cream and Frangelico. The ganache did not mix well and was drippy and lumpy; an unsightly yellowish oily substance trickled into the springform pan gutter once I spread the ganache on the cake. I refrigerated the cake and then wiped out the gutter. The taste was fantastic, the cake looked great, and no one noticed anything amiss, but I wonder if omitting the cream and Frangelico and simply using the melted chocolate wouldn't be just as good. If you've already Frangelicoed the cake, it will be boozy enough. I think you could go this route without harming your dessert.
  • I used El Rey chocolate, one of my favorite brands. El Rey is so fancy, it's sold in a special section at Whole Foods devoted to REALLY snooty shoppers. El Rey chocolate is single-sourced and superior to most other brands--just press it to your nose and inhale, like I always do, to the disgust of my fellow shoppers, and you'll smell the difference. I used 71 percent for the cake and a blend of 71 percent and 58 percent for the ganache. I think I could have gone with all-71 percent without making the cake unpalatable. My cake had a slight bitter tang that worked to render it a sophisticated, adult dessert rather than a saccharine confection.
  • If you are having a Frangelico crisis and are facing an empty bottle, you have my permission to use rum.
  • At the party, a chocolate hater tried the cake and ate an entire piece. That is the kind of cake it is.
  • My photography skills are substandard, so my cake slice photos turned out wretchedly, but here's a close-up of the crumb of this cake. Moist, moist, moist!

Verdict


5 stars.

Saturday, February 7, 2015

Smoky Vegetarian Pepperoni Rolls

It was the Super Bowl! Time for some snacks. These rolls are based on the pepperoni rolls native to West Virginia, but they have a twist: instead of meat pepperoni, they have the veggie kind, and instead of regular cheese, they have smoked. This year, I added herbs and spices for a flavorful bite. You'll want to dip these in pasta sauce--I like fra diavolo or puttanesca; something with an edge. This recipe makes enough for a party, but if you're making rolls for one or two, you may want to halve the recipe.


makes about 24 rolls


Ingredients 


3 cups water
1 Tbsp sugar 
2 packets yeast
1 1/2 Tbsp salt
6 1/2 cups white flour
olive oil
cornmeal
2 packages veggie pepperoni (I prefer Yves)
4 cups shredded smoked provolone
ground black pepper
red pepper flakes
dried basil
dried oregano


Process


Dough


Heat the water in a saucepan until it is wrist temperature. Add the sugar and yeast. Let sit for 10 minutes.

In a bowl, combine flour and salt. Mix with yeast water. Knead until the dough is smooth and elastic. I like to coat my hands with olive oil as I'm kneading. When the dough is pliable and smooth and responds when poked, with that living quality yeast dough takes on, coat it with olive oil, pat some around the inside of the bowl, and let rise. I like to put a damp cloth over the bowl and set it in a barely-warmed oven. The rising should take 1-1/2 hours, until the dough has doubled in bulk.

Once the dough has risen into a puffy mass, punch it down and roll it up again. Divide into four rounds. At this point, you can save the dough for later by coating each round in olive oil, sliding it into a one-gallon plastic bag, sealing the bag TIGHTLY, and putting the bag in the refrigerator. You want to make sure to seal the bags oh-so-tightly because, any gap, and you'll open your refrigerator to an oozing dough monster that has snaked out and expanded to engulf other food items. You may want to open the fridge and punch down the dough in each bag every so often until the dough has chilled into submission.

Pepperoni Rolls


40 minutes before you want to bake your rolls, set your oven to 500. Put your pizza stone, pizza pan, or other pizza-baking device in the oven so that it heats up and gets all ready to produce a crispy crust for you.

Get out your grated cheese, your pepperoni, and your spices. If you wish, divide pepperoni into four piles.

Obtain a large sheet of parchment paper and lay it on a flat surface. Sprinkle plenty of cornmeal on the parchment paper. Take your first round of dough, lay it on the cornmeal, and turn it to coat it on both sides. Smush it horizontally into a long, flat shape. Lay another sheet of parchment paper on top and then roll out the dough with a rolling pin until the dough is flat and vaguely rectangular. This is not an exact science, and the dough doesn't need to be paper-thin (maybe 1/8-inch thick). You want about a four-inch width. Remove the top sheet of parchment paper and cover with a layer of grated cheese. Sprinkle with pepper, red pepper flakes, basil, and oregano. Then, layer with pepperoni. A single line of continuous, slightly overlapping pepperoni is fine. Again, not an exact science.

When you have the right balance of pepperoni, cheese, and spices, roll the dough lengthwise into a long, thin cylinder. Pinch the ends closed. Cut the cylinder into segments with a knife: maybe five or six. If you want, you can create dimpling in each segment by pressing the blade of the knife down a few times without breaking the dough.

Place the pizza rolls on a third sheet of parchment paper and repeat the process with the other three rounds of dough.

Pull out your pizza stone or baking sheet and--very carefully--place your pizza rolls on top. Put the stone back in the oven and bake for 15-20 minutes, or until lightly brown.

Remove from oven and serve with dipping sauce. Your kitchen will smell like Sicily.


Notes


  • This seems like a lot of effort, but it's really quite easy.
  • I usually like to add whole grain flour to anything I bake. Not this time, though. Whole-wheat pepperoni rolls sounds downright un-American.
  • In the past, I used smoked mozzarella instead of provolone. Smoked provolone has more flavor and a meatier texture, in my opinion, but mozz will do if that's what you have. 
  • I estimated four cups of cheese, but I grated mine right on top of the dough, so I'm not sure. You may want to go the Tipsy Crumpet route and improvise until it feels right. Tip: you can't really overdo it, but you can underdo it.
  • The recipe I used said to boil some water and put it in a baking pan underneath the pepperoni rolls to create a steamy atmosphere. The oven sauna seemed to create a tender, airy texture, but the bottoms of the rolls weren't as crusty as I wanted. You can try this or not; the rolls will be scrumptious either way.
  • You will end up sweeping up a lot of cornmeal. But those golden crunchy bits add the perfect bit of texture the final product. Viva Quaker!

Verdict


4 stars. A great snack, and leftovers will keep for about a week in your fridge in an airtight container. Don't microwave, though; this is one snack best reheated to toasty perfection in the oven.