Monday, December 22, 2014

Roasted Vegetable Pot Pie with Rosemary Biscuit Topping

I wanted to make a main dish for a party, and a pot pie topped with biscuits--a savory cobbler--seemed irresistible. I used a recipe, but I adapted it so much, I might as well have created it from scratch. This pie takes a long time, but it's worth it. The double roasting of the vegetables produces maximum flavor and sweetness, and the dried mushrooms balance out the pie with an earthy note. The biscuits are fluffy and tender due to the use of buttermilk. You can use any mix of fresh and frozen veggies for this pie; it's extremely versatile. Sadly, I did not get a good photo of it, but you can see it on my holiday table being upstaged by a cake and a loaf of bread.


Ingredients


6 carrots, preferably of different colors, sliced
2 large parsnips, sliced
1 large or 2 small sweet potatoes, cut into 1/2-inch chunks
1 Tbsp olive oil
salt
pepper
6 cups water
2 Tbsp vegetable bouillon base
1 oz dried porcini mushrooms
1 small package microwavable fresh green beans, trimmed
3 Tbsp butter
1 onion, chopped
6 shallots, chopped (about 1/2 cup)
4 cloves garlic, minced
3 stalks celery, sliced
1 cup peas, fresh or frozen
1/2 tsp minced fresh rosemary
1/2 cup flour
1/4 whipping cream or sour cream
2 Tbsp dry sherry
dried sage
dried thyme
dried savory
celery seeds
1 small package chives, chopped (about 1/3 cup)

5 cups flour
2 Tbsp baking powder
1/4 cup fresh rosemary, minced
2 tsp salt
1 1/2 sticks chilled butter, cubed
2 1/2-3 cups buttermilk
paprika (optional)


Process


Got three hours? Roll up your sleeves!

Preheat the oven to 425 degrees. Line a baking sheet with parchment paper, then cover it with the carrot, parsnip, and sweet potato chunks. Massage the veggies with the olive oil and grind in some salt and pepper. Roast until tender, checking with a knife in 20 minutes and every 5 minutes after that. When you take out the veggies, reduce the oven temperature to 400.

While the veggies are roasting, microwave your green beans according to the package directions (a lazy step, I know, but the rest of this is so labor-intensive, you'll thank me).

In a saucepan, heat the water and bouillon. When these reach the boiling point, add the dried porcinis. Remove from heat.

In a Dutch oven, heat the butter. Add the onions and shallots and cook for 10 minutes on medium-low heat until transclucent.

Chop the cooled green beans into 1/2-inch pieces.

Add the green beans, garlic, celery, peas, and rosemary to the Dutch oven. Cook for another 5 minutes.

Add the flour and coat the veggies evenly. Stir and let cook for one minute.

Add the cream or sour cream, sherry, and broth with the mushrooms. Cook until sauce has thickened and reduced somewhat, about 8 minutes. Stir in more flour as needed to thicken the sauce.

Add dried sage, thyme, savory, and celery seeds as seems appropriate to season the broth (around 1 tsp each). Grind in more salt and pepper as needed.

Add the roasted veggies (they should be done by now) and the chives. Stir until veggies are evenly coated with sauce and sauce seems sufficiently thick and well-integrated with the veggies.

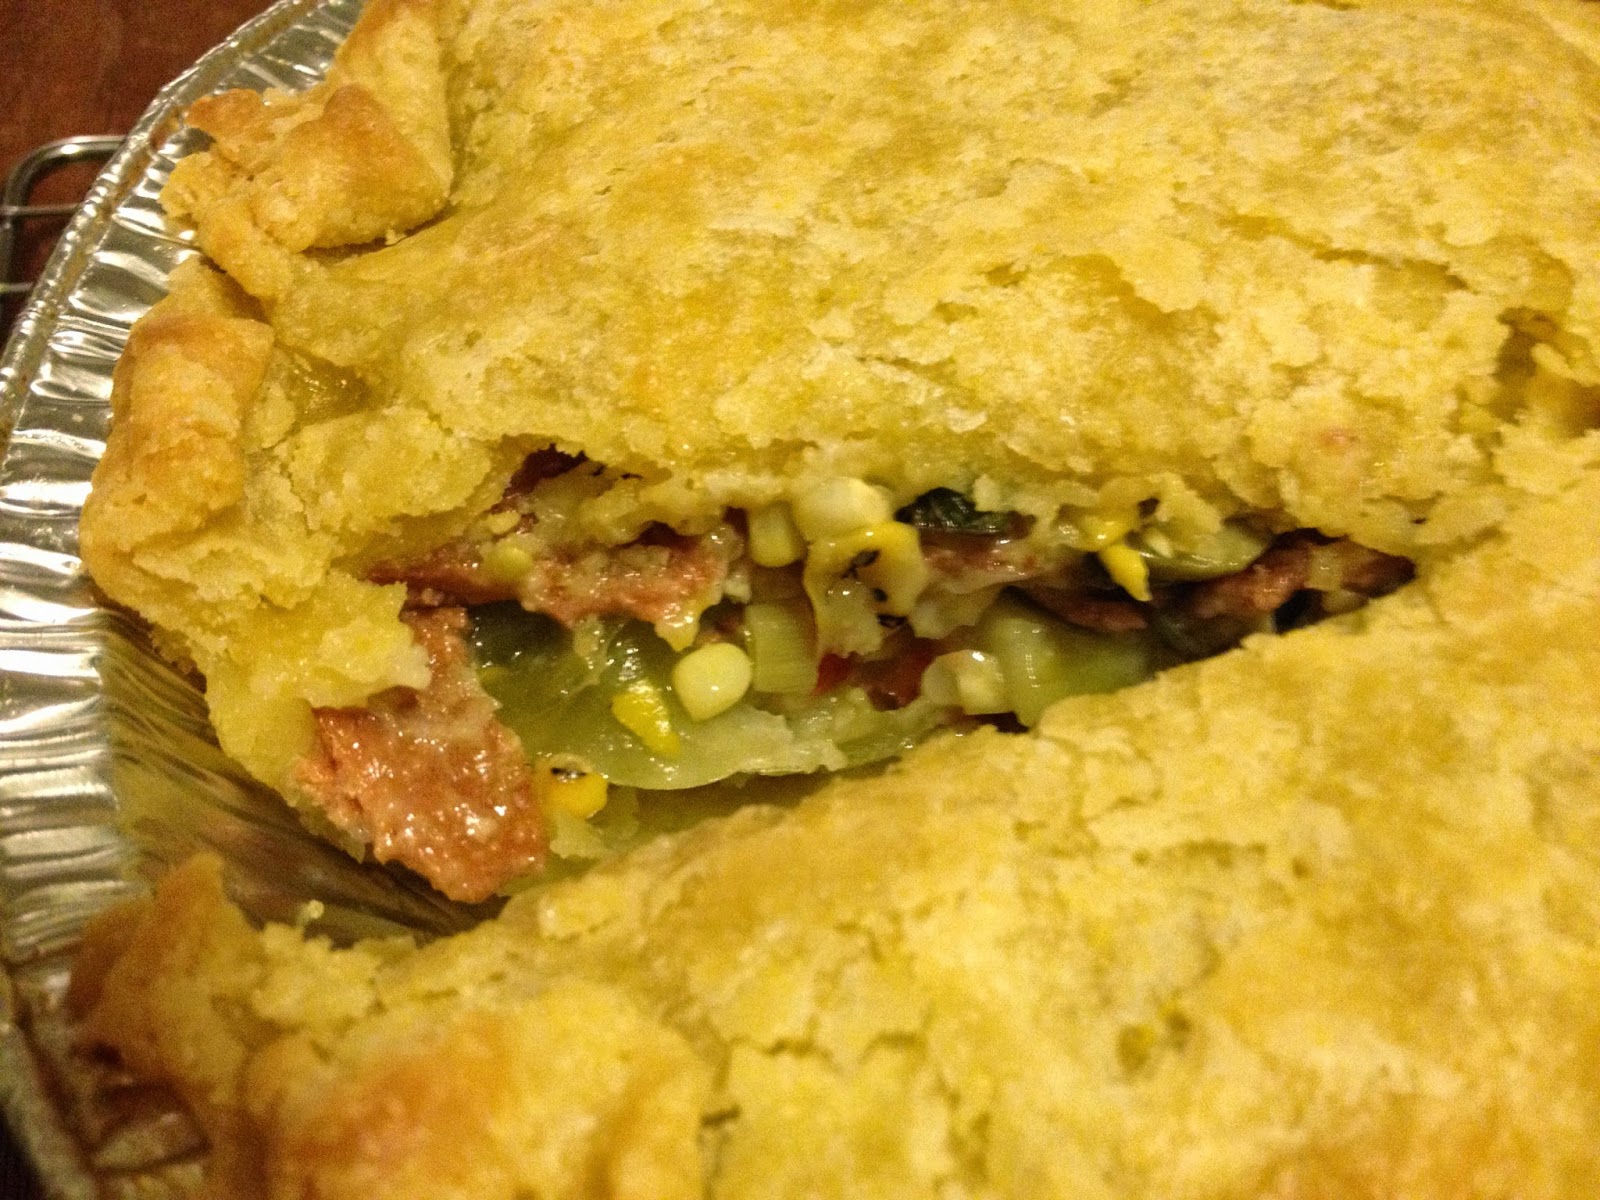
NOW, get a 9 x 13 glass baking pan. Will the veggies and sauce fit in the pan? You can always do like the Awkward Chef and line the bottom oven rack with aluminum foil to catch drippings. Pour the veggie mixture into the baking pan. Hopefully, it's enough to fill the pan, but without the danger of leaping overboard in simmering zeal. This was miraculously the case with my filling, which, although dangerously close to sloshing out, never did (at least, not until I topped it with giant clumps of biscuit dough).

Bake the filling for 40-50 minutes. The roux will brown and the veggies will meld, the onions and shallots transforming into a sweet, slow-roasted glue.

While your pie is deepening into itself, make the biscuit dough. (Okay, first clean up a bit. I bet your kitchen is messy and splotched. No roux spatters!)

Stir the flour, baking powder, rosemary, and salt in a large bowl.

Cut in the butter until the flour becomes a coarse sand.

Add the buttermilk slowly, mixing all the while, until you have moist clumps of dough.

Pull your baking pan from the oven. Blanket that filling with biscuit-sized rounds of dough. Nice, big ones. When you're finished, sprinkle the biscuits with paprika.

Now you're really going to want to make sure your oven is lined with aluminum foil. Put some beneath the baking pan for good measure. At this point, you may wish that you and your kitchen were aluminum-lined.

Bake for about 45 minutes, until a knife inserted into the runniest biscuit terrain comes out clean.

Cool for 15 minutes before serving.

This tastes even better in a day or two, heated up in the oven.


Notes


  • This pie was originally all root vegetables, but my boyfriend doesn't like turnips or rutabagas, and celeriac seemed a dubious option. As I noted above, you can be extremely versatile with ingredients. Some blue potatoes, for example, would be nice in place of the yams. Roasted red cabbage would add an interesting note. I wouldn't go with fresh mushrooms, though, because you want the chewy texture of the dried.
  • You can also be versatile with the seasonings and herbs used. No need to go with any of the any of the above if you'd prefer something else.
  • While we're at it, I doubt that the dried mushrooms HAVE to be porcini.
  • I used vegan sour cream in the roux because I have a lactose-intolerant friend and accidentally bought the French vanilla soy creamer. A frantic ransack of my fridge brought to light a still-good container of Tofutti. To my relief, it turned out great! Anything creamy will do.
  • The original recipe called for half the amount of biscuit dough. It obviously didn't know with whom it was dealing.
  • You don't HAVE to roast the veggies the first time around. It will not kill anyone if you saute them along with the other veggies.
  • One small package of rosemary will do for the rosemary. One small package of chives will do for the chives. No need to kill yourself with precise measurements.
  • If all your oven-dripping prevention activity is for naught and you end up with quickly burning patches of roux on your oven walls, know that the appetizing smells of the roasting veggies will overpower the acrid scent of burning flour and bouillon. I would not have dreamed that this was true, but it is!

Verdict


5 stars. If you get past my finicky notes and messy kitchen-shaming and make this, you'll be glad you did.

Tuesday, November 25, 2014

Za'atar Pretzels


What is za'atar? It's a savory Middle Eastern blend of thyme, garlic, sesame seeds, sumac, and other herbs and spices. The sumac gives it a bright, lemony flavor and the garlic and sesame seeds lend it an earthy gristle. Za'atar is delicious, and you won't be able to live without it once you sprinkle it on some garlic toast or a slice of pizza. As far as za'atar conveyances go, you can't get much better than a hot-out-of-the-oven homemade pretzel. Perfect for wintry days and stormy nights, and ideal for dipping in whole-grain mustard.

Ingredients


1 cup water slightly warmer than room temperature
1 package active dry yeast
3 Tbsp olive oil
2 1/2 cups flour
1 Tbsp nutritional yeast
1 Tbsp za'atar
1 Tbsp sugar
1 1/2 tsp salt
1/4 cup baking soda
1 Tbsp dark brown sugar
1 egg, whisked
coarse kosher salt
za'atar for topping


Process


Make the dough.


To prepare the water, I usually pour cold, filtered water in a small saucepan and heat it until it's just slightly warmer than my finger. Yes, my breads all have finger juice in them!

Once the water is finger-perfect, pour in the yeast and sugar and let stand for 10 minutes.

In a bowl, combine the flour, yeast, za'atar, sugar, and salt. Stir in the yeasty sugar water and the olive oil. Knead for five minutes, or allow your hand mixer to do the work, with dough attachment. I choose the latter option because my carpal tunnelly wrists would wilt like lilies if I had to knead for any length of time.

Wash out the bowl, coat it with oil, then nestle your now-elastic and pliable dough ball into its clean new home. Throw a damp towel over the bowl and let the dough rise for an hour.

Shape the dough.


Take two baking sheets and cover them in parchment paper.

Gently punch down the dough and divide it into 8-10 pieces (more if you want smaller pretzels). On a floured surface, roll out one piece until it's long and skinny.

Create a circle by bringing both ends toward you.

Twist the two strands around each other.

Lift each end back to the round part of the circle and fold it around the dough such that the pretzel stays in position.

I promise you that you'll pick this up quickly and that it will be easier than it sounds.

Lay the pretzel on one of the baking sheets and start again until all the dough has been shaped.

Cover the dough with the towel.

Prepare the bath.


These lucky pretzels are now going to luxuriate in a baking soda bath!

Preheat the oven to 450.

Fill a large pot or Dutch oven 3/4 of the way full with water. Bring to a rapid simmer, then add the baking soda and brown sugar. The water will froth up. Reduce heat and maintain the simmer.

When the half hour is up, lower 3-4 pretzels into the water. Let them relax for 30 seconds, then flip them over with a slotted spoon or metal spatula so that the other side can enjoy 30 seconds of spa time. Remove and return to the baking sheet.

Repeat this process with the other pretzels.

After all the pretzels have delighted in their bath, brush them with the egg wash and sprinkle with the coarse salt and plenty of za'atar. They'll puff a lot, so lay it on thick.

Bake.


Bake 12-15 minutes, until the pretzels have turned golden-brown.

Place them on a wire rack.

Make a mustard dip: combine some whole-grain mustard, some smooth Dijon, and a dash of IPA or pale ale. Mix and spoon into a small serving dish.

Serve the pretzels with the dip and eat steaming hot.

Variation


Now that you've mastered pretzels, you're just a hop, skip, and jump away from making pretzel dogs, or, in my case, pretzel veggie dogs, otherwise known as HALLOWEEN MUMMIES.

To make these, blister 8-10 dogs on a hot pan for 10-15 minutes. The last thing you want is for your pretzel dough to encase pale, uncooked fake meat.

Wrap the dough around the dogs, covering the ends entirely.

Immerse the dogs in the bath and repeat as before, sprinkling with black sesame seeds and paprika instead of za'atar if you want to try another variation.


Notes


  • These aren't as hard to make as you think. Try out the recipe on a snow day! The pretzels will disappear instantly and you'll be primed for a nap.
  • These are also fine the next day if you heat them up in the oven first.
  • I tried adding other seasonings to the dough before baking, but you can't really taste them in the end. The seasonings you put on top will be much more prominent.

Verdict


A definite five stars.


Thursday, November 20, 2014

Blistered Green Beans with Harissa and Toasted Almonds

Do you like green beans? Like them skillet-blackened and served with a vibrant Middle-Eastern chili paste? Then you will love this recipe. I adapted it from Bon Appétit's version, which calls for chilis you can't find in the northeast in winter. I used my cast-iron Lodge, and it's never been put to better use than in creating this tantalizing side dish.


serves 4-6

Ingredients


1 red bell pepper
3 dried red chilis (I used chiles de árbol, or bird's beak chilis)
3 garlic cloves, minced 
1 tsp kosher salt, plus more for seasoning 
3 Tbsp olive oil, divided 
juice from one lemon
1/4 tsp ground coriander 
1/4 tsp ground cumin
freshly ground black pepper 
2 pounds green beans, ends trimmed 
1/4 cup unsalted almonds


Process


Preheat your oven to 425.

Stem and de-seed your red bell pepper. Chop into big pieces, lightly oil the pieces, then put them on a baking tray and into the oven. They will need about 20 minutes to char and soften. Flip once or twice.

Stem and seed your dried chilis (retain seeds of one or more if you want extra heat, but be careful--bird's beak chili seeds will not exactly glide soothingly down your esophagus).

Set a small pot of water to boil. Set your skillet on high heat and toast the chilis. Remove when they are browned on both sides--about 3-4 minutes.

Immerse the chilis in the boiling water. Let them soak for 15 minutes, then put them on the tray with the bell pepper pieces.

Place your almonds on the hot skillet. Toast for 3-4 minutes, stirring occasionally. Remove from heat, let cool, and chop.

This is a good time to trim those beans.

When the bell pepper pieces look soft and are beginning to wrinkle, with beautiful char marks on both sides, remove pan from oven.

While the peppers are cooling, throw together the garlic, salt, 1 Tbsp olive oil, lemon, cumin, and coriander. You can use a small blender or a mortar and pestle to mush the ingredients together. I used the latter implement.

Chop the bird's beak chilis and the bell pepper finely. Add them to the rest of the mixture and pulverize until you have a chunky sauce (or frantically pound with a potato masher, as I did when our blender proved useless and the mortar and pestle did not seem up to the task). You can add a little water if it helps. Add the almonds at this point.

Set your skillet on high heat again. Place your trimmed beans in a bowl and toss with 2 Tbsp oil, salt, and pepper.

Throw half the beans onto the skillet. It will take about 10 minutes for them to soften to a succulent yet firm state. Stir occasionally, letting the beans char all around.  When they appear done, throw them on the baking sheet and into the still-warm oven.

Pour your next batch onto the skillet.

When beans are finished, put them back in the bowl and toss with the harissa. Serve hot.

Notes


  • I tried this dish both hot and cold and it was better hot.
  • The heat level is mild to moderate without the seeds. Next time, I think I would keep the seeds of one chili for more fire.
  • All recipes tell you to remove the skin from roasted bell peppers. I reject this. It's healthy, delicious, and in no way a threat to the sauciness of the harissa. Leave the skin on, says I.
  • I love the beans al dente, putting up resistance like a prize fighter who doesn't want to go down. If you prefer a more tractable bean, blanch the beans in boiling water for 3-4 minutes and then plunge into ice water before putting them in the skillet.
  • The effect of the burning-hot, heavy cast iron is key to the success of this dish. If you lack a skillet, go buy one! But while you're waiting, you can make this on a grill or broil the beans for a similar effect.


Verdict


Side dish win! I would definitely make this again.


Monday, October 6, 2014

Blackberry Pie

I usually don't post recipes that I've taken from other sources without having modified them at all. But I adore Isa Chandra Moskowitz and and Terry Hope Romero and their vegan baking wizardry, and I want to share the recipe for this pie, which tastes like a tart mouthful of summer. Two lemons plus blackberry liqueur plus a pailful of berries make for an outstanding rustic dessert. Bring on a scoop of organic vanilla ice cream and you'll be flying off the porch swing.


serves 8

Ingredients


Crust


2 1/2 cups flour
pinch salt
3 Tbsp sugar
8 Tbsp cold Earth Balance
8 Tbsp cold shortening
6 Tbsp ice water
1 Tbsp apple cider vinegar


Filling


6 heaping cups blackberries
zest of 2 lemons
3 Tbsp fresh lemon juice (about two lemons' worth)
2/3 cup sugar
3 Tbsp blackberry brandy or Chambord
3 Tbsp cornstarch
pinch cinnamon


Process


Crust


Sift flour and salt in a large mixing bowl.

Mix in sugar.

Add 4 Tbsp each of Earth Balance and shortening, crumbling them into the flour with your hands until the flour gets pebbly.

Add the rest of the Earth Balance and shortening. Your flour should be VERY pebbly.

Mix the ice water and vinegar and drizzle it into the flour, massaging it in as you go. Add more water if you need to, but do so slowly so as to avoid the dreaded soggy crust.

Divide the dough into two equal rounds. Press the rounds into disks and wrap in plastic. Refrigerate them until you're ready to use them, or freeze them if you're going to take a day or so to make your pie.


Filling 


Preheat oven to 425.

In a large bowl, toss together berries, lemon zest, lemon juice, sugar, brandy or Chambord, cornstarch, and cinnamon. Easy!

Roll out pie crust to fit a 9-inch pie plate. I do this by placing the dough between two large sheets of parchment paper and rolling it out in all directions until it's flat and thin. I then take a leap of faith that it will be large enough for the pie plate and feverishly mush it flatter if it isn't.

Heap filling into bottom crust.

Roll out the top crust and place on top, pinching sides into place and poking top with a fork.

Note that this is vegan dough, and so extremely soft, with no gluten whatsoever. The recipe calls for cutting it into strips so as to create a lattice filling: yeah right! This is for braver souls than I. My crust was a ragged heap of disparate scraps, but they bonded in the baking process, making for an almost-normal-looking crust (see above).

Bake for 20 minutes, then lower heat to 350 and bake for another 30-35 minutes, until golden-brown and bubbly. Cool on a wire rack for at least half an hour before digging in.


Notes


  • The filling can't be beat. I'm a huge fan of citrus in desserts, and the blend of tart and sweet, with a hint of liqueur, somehow makes for the archetypal blackberry experience.
  • The crust is not bad for a vegan crust. It's sandy and flavorful; however, it gets soggy relatively quickly. If you're planning to keep the pie around for a few days and don't care whether or not it's vegan, use these ingredients, as found in this whiskey apple pie recipe: 2 cups flour, pinch salt, 15 tablespoons cold butter (almost 2 sticks) and 1/4 cup + 1 Tbsp cold water. I've had great success with this yummy, flaky crust.
  • I highly recommend all of the dessert books put out by Isa Chandra and Terry Hope. Their cookie and cupcake books produce to-die-for desserts every time. I've only just started using their pie book, but this recipe seems a harbinger of good things to come.

Verdict


4 stars; would be 5 with a butter crust (but at least use pasture-raised butter).

Madagascar Hot Chocolate Cookies

I had purchased a cinnamon-chili pepper chocolate bar from Madécasse, my favorite Brooklyn-based Madagascar chocolate purveyor, and wanted to make some cookies for a party. What I craved were brownie-rich cookies with a velvety texture and spicy chocolate chunks. I made what seemed like a lot, yet they disappeared with a quickness. Every so often, I bake cookies and proclaim them the "best I've ever made." This was one such time.


makes around 28 cookies

Ingredients


1 stick butter
1 bar 80% chocolate
1 bar 71% chocolate
1 bar Madécasse cinnamon & chili pepper chocolate
2 eggs, room temperature
1 tsp vanilla extract
1 1/2 cups white sugar
1 cup flour
1/2 cup unsweetened cocoa powder
1/2 tsp baking soda
pinch salt

Process


Preheat oven to 325. Line some baking sheets with parchment paper.

In a double boiler or pan-within-a-pan-of-boiling-water, melt the butter and the broken-up bar of 80% chocolate. Toss in two squares of the 71% chocolate. When you see only a few lumps, remove the pan from the heat. Allow the lumps to gently become one with the chocolate-butter broth, stirring occasionally.

Chop the Madécasse and four to six squares of the 71% chocolate, depending on how chocolatey you want to go. I like to chop fine rows in the chocolate, and then turn them 90 degrees and chop again so as to produce small chunks.

In a bowl, beat the eggs. Add sugar and vanilla extract and mix until uniform.

Pour in the cooled chocolate mixture and combine.

In a separate bowl, sift flour, cocoa powder, baking soda, and salt. Mix these together, then gently fold into the wet ingredients.

Add chocolate chunks and fold them into the batter.

Refrigerate the batter for 30 minutes.

Using your fingers, scoop the batter onto your baking sheets in 1 1/2-inch rounds. You can also use a scoop, but where's the fun in that?

Bake for 8 to 10 minutes. Cookies will be very soft and gooey, yet will "bounce back" when poked.

Cool on a wire rack.

Notes


  • This finicky combo of chocolates produces a deep, bittersweet taste. Of course, you can go with a different blend of chocolates, as long as they equal 9 to 10 ounces.
  • If you lack spicy chocolate, simply add cinnamon, ginger, and a dash of cayenne to the batter.
  • I used bourbon barrel-aged Madagascar vanilla from Kentucky. So yummy!
  • Refrigerating the batter causes it to spread more slowly in the oven, resulting in a thicker, gooier cookie. But these cookies taste just as good spread thin. You'll just have to bake them for less time.
  • I needed three baking sheets' worth of cookies, but I put them in the oven in two installments. I've found that more than two baking sheets' worth of cookies lengthens the baking time and negatively affects the results.

Verdict


These might have to take 5.5 stars.


Saturday, September 13, 2014

Not-So-Scrumptious Strawberry Cupcakes

These cupcakes look delicious, don't they?

overly sweet cupcakes of dismay

I used a recipe I'd been wanting to try for a year and a half--something about adapting Grandma's strawberry jello cupcakes to the healthy(er) modern age. I made the cupcakes, made the frosting, and even spread a layer of chocolate ganache between cake and frosting. What could be more delectable than a strawberry cupcake topped with chocolate and more strawberry? A whole lot of things! The topping was much too sweet, the ganache was lumpy, and the cake was a flavorless, dense calorie bomb. Even the Crumpet falls sometimes.

Smoky Poblano Mac and Cheese

A potluck was coming up. What to do? I like providing a veggie-filled option, but not too healthy. There's nothing worse than lugging home a barely touched vat of tofu surprise. At Whole Foods, I spied a gleaming heap of poblano peppers grown at my favorite pick-your-own orchard, Homestead Farm. "Oooooh!" I thought. I then poked around online and found this recipe. For more flavor magic, I upped the poblano content and added smoked pepper jack. The end result smelled like bacon on a skillet, with a garlic-infused roux and crunchy topping. I doubled the recipe and it was nearly gone, but with just enough leftovers for lunch the next day. Huzzah!


 serves 6-8 

Ingredients


3 poblano chiles
8 oz whole wheat elbow pasta
2 Tbsp butter
4 cloves garlic
2 Tbsp flour
1 1/2 cups whole milk
1 tsp mustard powder
1/2 tsp cayenne powder
1/2 tsp ground cumin
zest of one lime
salt and pepper to taste
2 cups grated sharp cheddar
2 cups grated smoked pepper jack (or a smoked cheddar/pepper jack blend)
1 cup panko or breadcrumbs
cilantro for garnish (optional)


Process


Set a pot of salted water to boiling and cook your pasta until it's al dente. Drain and set aside.

Set the oven to 425.

Lightly oil a baking sheet. Core the poblanos and place them on the sheet.

Roast for 15-20 minutes, or until peppers start to blister and soften. Flip them halfway through the process.

Remove peppers from oven. Most recipes advise you to peel the skin, but why? It's healthy, it does no harm, and you won't even know it's there. Allow your peppers to cool with dignity!

Lower the oven to 375.

As peppers are roasting, melt butter in a saucepan over low heat. Use a garlic press to drizzle in the garlic. All of a sudden, your kitchen smells like hot garlic bread. Give the butter and garlic a minute to develop amity, then whisk in the flour. A golden-brown roux will form, at which point you whisk in the milk. Allow another two minutes for the flavors to meld and the sauce to thicken, whisking now and then.

Chop the cooled poblanos.

Remove pan from heat. Add mustard, cayenne, cumin, lime zest, salt, and ample ground pepper. Scoop in the poblanos. Stir.

Add 1 cup sharp cheddar and 1 cup pepper jack to the sauce, stirring so that the cheese melts. If cheese refuses to melt, heat the pan on low heat until it submits.

In a bowl, combine pasta and sauce. Pour into a baking pan or skillet.

Cover with the remainder of the cheese. Shake the panko evenly on top.

Bake for 25 minutes, then broil for 5. Remove from oven when sauce is bubbling and top is golden-brown.

Sprinkle with chopped cilantro.

Let cool 5 minutes, then serve.

Notes


  • When I made this, I scraped two ears of fresh corn into the sauce in a misguided bid to up the veggie content. Don't do this! The corn added a sweet note that has no place in this dish.
  • The original recipe calls for 1/2 cup of cilantro in the sauce. I forgot to add this, and so it became the garnish. I tried leftovers with cilantro mixed in, and actually prefer the mac without it. The peppers stand out more, and the flavor seems deeper and less Tex-Mex.
  • I used a block of white cheddar for the sauce, and block of sharp orange Tillamook for the topping, giving the crust that lusted-after cheddary appearance. 
  • Spice level: if you were eating the poblanos raw, they would be moderately spicy. The roasting gives this dish a gentle heat, but not the kick in the pants you might imagine. If you want a hotter mac, slice a fresh jalapeno into the sauce and up the cayenne content. I love smoked paprika (pimentón), but was afraid to add any for fear that it would throw the flavors out of whack. If you want to try some, I suggest sprinkling it on top after pulling the pan from the oven.
  • Don't forget the lime zest! This ingredient is what gives this mac its je ne sais quoi and was the reason I tried this recipe. 

Verdict


Who doesn't love mac and cheese? Who doesn't love a smoky, mysterious potluck dish? 5 stars!

Tuesday, September 9, 2014

Oatmeal-Raisin Shortbread

I saw a recipe for raisin shortbread and couldn't resist packing in some oats. With an egg wash, this is a nutritious source of protein and fiber as well as a delicious breakfast cookie. If you use fancy, pasture-raised butter and a certified humane egg, you'll feel GREAT as you dig into these bars.


makes 18 biscotti-length or 36 short bars

Ingredients


2 sticks butter, softened
1 cup confectioner's sugar
1 tsp vanilla
1 1/4 cups flour
1 1/4 cups quick oats
pinch salt
1 to 1 1/2 cups raisins
egg, beaten


Process


Preheat oven to 350.

I like to do this kind of thing by hand, but you can use a mixer.

Blend butter, sugar, and vanilla. If you do this with your hands, you'll get a bonus: smooth, buffed hands! It's like a pre-cookie spa treatment. The recipients of your cookies will get some extra protein in the form of dead skin cells.

In a separate bowl, combine flour, oats, and salt. You may sift the flour, but I'm skeptical that this accomplishes much. Add the raisins. Fluff with your hands until raisins are coated with flour.

Combine wet and dry ingredients until just mixed, with no streaks.

Obtain a 9 x 13 pan.

Pat the batter into the pan until even. Run a fork along the top of the batter for crackly texture.

I refrigerated the pan for 30 minutes, then used a spatula to cut bars into the dough. You can do this at this point or after the shortbread is baked. I was afraid the oats would make the bars too crumbly after the shortbread was in its final form.

Using a pastry brush, apply the egg wash. If you hate waste as much as I do and use the whole egg, you'll end up with puddles of albumen on your shortbread. Do this at your peril!

Bake the shortbread for about 30 minutes. I baked it until it started to brown on top, but I would have preferred a gooier texture and a more pallid surface.

Let the pan cool on a rack. Cut into bars if you haven't already done so, and remove these from the pan.


Notes


  • These would be great with rum or rum extract instead of vanilla.
  • If you want to go for a strong rum flavor, soak the raisins in half a cup of rum for a day or so. The oats won't know what hit them!
  • I would like to experiment with a thicker bar and might use a 9 x 9 baking pan next time.

Verdict


These snacks are the perfect blend of virtue and luxury.

Mexican Hot Chocolate Pie

This pie offers a spicy chocolate filling in a gingersnap crust with a cinnamon whipped-cream topping. I tweaked the recipe from Serious Eats to create a dessert that warms the palate, making you feel as if you're gliding down the Silk Road on a magic carpet.

one 9.5-inch pie

Ingredients

Crust


2 1/2 to 3 cups gingersnaps (I used Trader Joe's triple gingersnaps)
6 Tbsp melted butter
dash ground ginger
dash cinnamon
dash cayenne pepper


Filling


12 oz dark chocolate chips
1 cup heavy cream
1 egg
1 tsp vanilla
dash ground ginger
dash cinnamon
dash cayenne pepper
pinch salt


Topping


1 1/2 cups heavy cream
1/4 cup sugar
1 tsp cinnamon
pinch red pepper flakes
dark chocolate bar for shaving


Process


Crust

Preheat the oven to 350.

Obtain a 9.5-inch pie pan. If you're going for a 10-inch, you may want to increase the quantity of gingersnaps to 3.5 cups. If you're going smaller, this is your lucky day!

Pulverize the gingersnaps in a food processor. You should have about 2 cups' worth of crumbs (2.5 for a 10-inch pan).

Pour the crumbs into a bowl, then add the melted butter and spices. Toss with your hands until you have a delightful and uniform mound of cookie fluff. Try not to accidentally tip the bowl into your mouth.

Pat the mixture into your pie pan, forming a crust around the bottom and edges. If it seems too thick, you may remove some of the crumbs and spoon them into your maw. Just like cereal!

Bake the crust for 10 minutes, or until it begins to brown. Set it aside to cool. It should achieve room temperature before you pour in the filling, but no one will suffer if you can't wait that long. It helps to pop it in the refrigerator after a minute or so.

Filling

Pour the chocolate chips into a large heatproof bowl.

Warm the heavy cream in a saucepan until it is just boiling. Pour over the chocolate and let stand for about one minute. You may stir. The chocolate chips will ribbon out into gooey strands that embrace one another before chocolate and cream become one.

To help unify the ingredients, gently whisk them until the mixture is smooth and glossy. If it's a little grainy, no one will suffer.

Add the egg. I like to crack the egg into a separate container first to make sure there are no bits of shell. If you do this, muddle the egg with a fork a bit and add to the chocolate.

Pour in the vanilla.

Add spices and salt.

Pour into pie crust and bake for 25 minutes. The filling should be slightly wobbly in the center.

Remove from oven and let cool on a rack.


Topping


Pour cream into a mixer. Add the sugar and cinnamon.

Whip until soft peaks form. I'm not sure what this means, so I usually over-whip and get tough hillocks of cream. No one will suffer.

Mound the topping over the cooled filling. What will happen if your filling isn't that cool? Not much. Sprinkle red pepper flakes on top and decorate your pie with chocolate shavings. I use a Swiss peeler that some guy sold me at the Eastern Market, but the large blades on your grater will do in a pinch.


Notes


  • Serious Eats' recipe called for a little more than half the chocolate used here. Try a slice and imagine it with half the chocolate missing! Too sad to contemplate.
  • I would love to try a chipotle version of this. The Hot Chocolatier, a gourmet chocolate shop in Chattanooga, sells a chipotle truffle (The Hottie) that I'd love to re-create in pie form.
  • This pie is wonderfully smooth. The cream and egg make it softer than a ganache, but firmer than a pudding. It's hard to beat when edged with a crunchy layer of snaps.
  • I served this after a meal comprising strawberry-spinach salad with smoky bleu cheese, chili, and cornbread. It stands up to assertive courses and would dominate skimpy ones.
  • As you savor the first bite, take a moment to thank the conquistadors, mercenaries, and shady characters who plundered exotic lands to make the ingredients accessible to all.

Verdict


5 stars. This one is hard to beat.

Tuesday, August 12, 2014

Slow-Roasted Garlicky Green Tomatoes

I had some leftover green tomatoes from the green tomato pie with buttermilk-cornmeal crust and did not know what to do. Batter them up and fry them? Too greasy and reminiscent of Donne. Then I stumbled on this Gardening in the Mitten site. Yeow! I added some garlic to the tomatoes and then took some extra steps, as you'll see below. The slow-roasting gentles the puckery taste, giving the unripe fruits a deep, earthy flavor and a buttery mouthfeel. Red pepper adds some heat, and the garlic provides an Old World aroma, your kitchen transforming into a garden tended by Botticelli's goddesses.


Ingredients


a few green tomatoes (the unripe variety, not the heirloom kind)
a few cloves of garlic, peeled (two or three for every tomato)
splash or two of olive oil
salt
pepper
red pepper flakes

Process

Preheat your oven to 250. 

Line a baking pan with foil. Chop the tomatoes and lay on the foil. Add the garlic.

Drizzle olive oil on top. Grind salt and pepper, then add a dash or two of red pepper flakes.

Curve the foil so that it surrounds the tomatoes and prevents leakage. 

Roast for two hours.

For a delicious lunch, try the following:


Toast a sesame bagel. Lay both halves on a plate.

Layer the bagel halves with sharp cheddar.

Sprinkle with red pepper flakes.

Top with roasted green tomatoes.

Chop some radicchio as a side salad.


 Notes


  • I used only two tomatoes, but you can use any number. Adjust proportions of other ingredients accordingly.
  • This really does take two hours for optimal effect, so start at 10:00 if you want your lunch by noon!
  • This would be a great pasta topping with more red pepper flakes and parmesan. 
  • It might not hurt to zest a lemon on the tomatoes before roasting.

Verdict


Until now, I was scared of green tomatoes. Now, I'll look for them every August.

Saturday, August 2, 2014

Green Tomato Pie with Buttermilk-Cornmeal Crust

Inspired by Nothing in the House's green tomato pie, I decided to bake a pie featuring the unripe fruit, but savory instead of sweet. Being from the Bronx, I know next to nothing about green tomatoes and their properties, but I threw together a heap of my favorite ingredients, and the end result was smashing. A flaky, tender crust with a hint of grit gives way to a forkful of the season's bounty. I bought most of my ingredients at the Silver Spring farmer's market, and it was worth the airiness in my wallet to put this on the table.


Ingredients


Crust

2 1/2 cups flour
1/2 cup cornmeal
pinch salt
2 sticks butter
3/4-1 cup buttermilk


Filling


4-5 medium green tomatoes (the unripe kind, not the heirloom kind--they should be as hard and sour as a third-grade teacher coming back from vacation)
1 package veggie bacon
4 ears corn (or half a bag frozen, preferably Trader Joe's blackened kernels)
1/2 red pepper, diced
1/2 green pepper, diced
1/2 onion, diced
1 garlic clove
3 scallions, sliced
handful basil leaves, chopped fine
2 Tbsp cornstarch
pinch or two salt
generous amount ground pepper
1/2 tsp red pepper flakes
squeeze lemon
1/2 tsp honey
1 cup sharp cheddar, grated


Process


You'll probably want to alternate between the crust part of the instructions and the filling part. You can also make the dough ahead of time and freeze or refrigerate it. If you freeze, let it thaw for a few hours in the refrigerator before attempting to roll. You can also make the filling ahead of time and refrigerate.


Crust


Obtain a 10-inch pie pan. Set aside.

Cut the butter into cubes. Put in a bowl and place in the freezer until frozen--about 20 to 30 minutes.

Pour flour, cornmeal, and salt into a food processor. Pulse to aerate. (The lazy chef's way of sifting.)

When butter is frozen, pulse with the flours until the butter is in pea-sized chunks. It won't take a lot of pulsing. Even if you overdo it and the mixture turns into a sandy powder, let's face it, it will still be pie crust.

Pour everything into a bowl. Add buttermilk a little at a time and work it in with your hands until the dough just sticks together in a ragged clump. (I estimated the amount above, but use your best judgment.)

Form dough into two balls, wrap tightly in plastic, and place in the refrigerator for 30 minutes to an hour. Now you can start the filling!

Filling halfway there? It's time to roll the crust. Here is my no-fail, easy-if-you-have-all-the-components method.

Tear off two large sheets of parchment paper or wax paper.

Lay the first sheet on a silicon pie mat or your countertop.

Place one of the rounds of dough on the sheet. Place the other sheet on top.

Using a rolling pin (I prefer the French kind), roll out the dough, turning the mat or the sheet of paper as you go so that it flattens into an even circle (who are we kidding--a geometrically unclassifiable surface that looks vaguely round if you take off your glasses).

When the dough seems roughly the size and flatness needed to serve as a bottom crust, peel from the paper and place in the pie pan, trimming, adding, and crimping as needed. Prick some holes on the bottom and sides with a fork.

Place the pan in the freezer for 20-30 minutes. 

You have the filling all ready to go?

Don't reach for your iPhone just yet! You still have the other round of dough.

Repeat the steps above, chortling gleefully this time, as the dough won't have to labor like its more industrious twin to line a baking dish. It need only be dropped from above to form the perfect covering for your filling.

When the dough seems flat enough and the circumference long enough to form a top crust, take the bottom crust out of the freezer. Heap with filling, then top with top crust. Prick holes in the top crust with a fork.


Follow the instructions below for baking.


Filling


Preheat the oven to 425.

Put a little oil in a pan. Sear the veggie bacon. Remove from heat.

Thinly slice tomatoes and place in a large bowl. Add salt and toss.

Tear veggie bacon into pieces and toss with tomatoes.

Scrape the kernels off the ears of corn (or pour in frozen corn) and add to the tomato mixture.

Mix in red pepper, green pepper, and onions.

Crush in garlic.

Add scallions and basil.

Add cornstarch and toss until consistency is uniform.

Add ground pepper and red pepper flakes. Squeeze in lemon and massage in the bit of honey.

Grate in the cheese (I did this right into the bowl--the measurement above is an approximation).

Toss everything together with your hands. Add more of anything that seems underrepresented.

Once you've assembled your pie as described above, place it in the oven.

Bake at 425 for 10 minutes, then lower heat to 350 and bake another 40-50 minutes, until crust is golden-brown and edges are fizzing.

You may want to cover the crust with aluminum foil after the first 5 minutes, taking the foil off 10 minutes from the end.

Set pie on a rack to cool. Serve at room temperature or slightly warm.

I bet this pie tastes good cold.


Notes


  • I completely winged this recipe, and suggest that you do the same. For the filling, use whatever you like, in whatever quantities. The green tomatoes provide a backdrop for anything pungent, spicy, savory, crunchy, or herbal.
  • I actually used green olives instead of green pepper and onions, but tasting the pie a few times convinced me that green pepper and onions would have been the better call. This pie is so glorious, though, that olives won't exactly leave you crying in your beer.
  • If you want, you can chop up some rosemary and add it to the pie dough. You can also use dried herbs.
  • Gruyere would be good in lieu of cheddar.
  • I used veggie bacon because I'm a vegetarian. Salty protein from a vegetable: modern life is delicious.
  • I did not add a lot of basil for fear of overpowering the pie. You can experiment with more, or try other herbs such as marjoram or oregano.
  • This recipe is for a 10-inch pie. For a 9-inch pie, your crust could have 2 heaping cups flour, 1/3 cup cornmeal, 15 Tbsp butter, and 1/2 cup buttermilk. Maybe subtract a tomato.


Verdict


5 stars. One of my favorite recipes yet and a summer keeper.

Sunday, July 27, 2014

Rosy Blackberry Cobbler


Packed with summer-fresh berries, sliced peach, and rhubarb, this cobbler features a silky buttermilk topping. Two lemons' worth of zest marries happily with the fruits, transporting you to a sun-dappled orchard in which you romp through brambles, mouth stained with purple. I made this cobbler after a berry-picking expedition at Homestead Farm in Poolesville, Maryland.


Ingredients


1 stick butter
2 lemons

4 cups blackberries
2 peaches, thinly sliced
2-3 stalks rhubarb, sliced
3/4 cup sugar
dusting of grated nutmeg
dash or two of cinnamon
dash of ground ginger
3 Tbsp cornstarch

2 1/2 cups flour
3/4 cups sugar
dash or two of cinnamon
1 Tbsp baking powder
1 tsp salt
2 cups buttermilk


Process


Preheat the oven at 350.

Get out a 9 x 13 baking pan. No need to grease!

Melt the stick of butter in a small saucepan. When mostly melted, with one thin rectangle bobbing in its golden bath, remove from heat. The rectangle will vanish into its hot tub.

zest both lemons, producing a tinselly heap. Cut one of the lemons in half.

Toss fruit into a large bowl. Add the sugar, nutmeg, cinnamon, ginger, and cornstarch. Toss with hands to combine. It's going to be glorious! Add half the lemon zest and half the melted butter. Toss some more. Oh yes!

Pour the fruit into the baking pan, spreading it so that it's even.

In another bowl, combine the flour, sugar, cinnamon, baking powder, and salt. Add the other half of the lemon zest. Pour in the butter and buttermilk and fold into the flour. Batter will be slightly lumpy. No overmixing!

Spread the batter over the fruit. In typical Toppled Chef style, I scooped and spread it with my bare hands. It worked out pretty well.

Bake for 45-55 minutes, until fruit is bubbling and top is golden brown.

Pull out and let cool on a wire rack. I'd eat this the next day for breakfast, but you can always serve hot with a scoop of ice cream.


Notes


  • For the flour, I used 1 cup white and 1 1/2 cups white wheat, with a healthy shaking of flax, which is why you see speckles in the photo. You don't have to be this granola. However, any combination of flours should work. The butter and the buttermilk will ensure a tender crust.
  • Likewise, you can use any combination of fruits. I happen to love the earthy blackberries jazzed with rubescent stalk fruit and mellowed with peach, but blueberry-strawberry-nectarine would be just as good.
  • What kind of cobbler is this? It isn't a cakey cobbler, where the dough rises through the fruit, but the topping isn't quite a biscuit topping, as it's too runny to form mounds. It's more of a lazy fruit pie with a biscuity slump on top. This works for the Tipsy Crumpet!
  • Note that the knife test doesn't work to test doneness. I pulled the cobbler out of the oven after 30 minutes because the knife came out clean. The next morning, my heart sank as I spooned out a wad of fruit clumped with undercooked batter. It was edible, but I had to put the cobbler back into the oven for another HOUR to get it to an acceptable level of non-rawness. This did the trick, in case the same kitchen pratfall occurs to you.
  • Some people like a sugary cobbler. Not I! The 1 1/2 cups of sugar in this recipe go toe-to-toe with the double whammy of lemon zest and a heap of rhubarb. If you like your dessert to feel more like a slap on the face, this is the one for you.
  • This makes a delightful Sunday breakfast.

Verdict


4 stars. Quite good, if you like your cobbler topped with a tender crust and filled with the textures, scents, and colors of summer.

Saturday, July 26, 2014

Tangy Lemon-Herb Salad


This herbaceous salad dances on your tongue with a combination of summer greens, lemon, artichoke brine, and salt. You'll swoon, you'll eat more, you'll want only salad for dinner, you'll forget about dessert. If the Tipsy Crumpet would rather eat salad than anything else, you KNOW it's a good salad.


serves 4 as a dinner salad and 8 as a side salad


Ingredients

1 bag prewashed arugula
1 head radicchio
2 cups quartered artichoke hearts in brine (from the deli section is optimal)
1/2 cup pitted kalamata olives
any other veggie you want to add--cherry tomatoes, chopped red bell pepper, etc.
bundle fresh mint
bundle fresh chives
bundle fresh dill
1 lemon
pinch salt
few grinds pepper

Process


Obtain a large bowl. Fill with arugula.

Half the radicchio. Slice each half into ribbons, then turn 90 degrees and slice the ribbons into ribbons. It's like delicious geometry homework!

Mix the radicchio and the arugula. Add the artichoke hearts. Pour in some of the brine (when I say "some," I mean "some." Use your intuition.)

Add the olives. Give a few good tosses with your hands. Looks pretty good, doesn't it?

Chop as much mint, chives, and dill as seems appropriate. Toss with the veggies. Add any other veggies you have.

Cut the lemon in half and squeeze one half on the salad. Toss with your hands. At this point, you may nibble an arugula leaf. Does it need more lemon? Squeeze on the other half (the Tipsy Crumpet likes a LOT of lemon).

Add the salt and pepper. Toss with your hands.

Now you have a fresh, gleaming, tart, tangy, and tender dinner accompaniment.

Notes


  • You could add some feta cheese. You don't need it, but it couldn't hurt.
  • If you're not crazy about feta but still want cheese, grate in some parmesan or asiago, using the larger grater holes so the cheese doesn't dissolve into the dressing.
  • This is a flexible salad. You can use other herbs, though chives, dill, and mint play well together and taste great with lemon. Basil would overwhelm the salad and hog all the attention. Oregano might taste too bitter. But mix and match and try anything you want. As long as you have brine, lemon, and salt, you'll want to keep eating until the last leaf is gone.
  • You really don't need other veggies for this salad. But if you're serving it as a dinner salad, garlic bread would be a terrific accompaniment. Slice a whole-wheat baguette lengthwise, smear with olive oil, and top with crushed fresh garlic. A few shakes of dried basil and red pepper flakes, a brief stint in the oven at broil, and you'll have a crunchy, pungent sidekick to your meal.

Verdict


This is a five-star salad.

Tuesday, July 22, 2014

Seven-Mango Layer Cake with Raspberry Filling and Mango-Rum Frosting (vegan)

I created this cake for an Earth day/birthday party. Super moist and fluffy despite the lack of eggs, the cake earned rave reviews from the non-vegan crowd. You need a LOT of mangoes to make this work, and the cake is somewhat labor-intensive, but it's worth it. It's like a vegan prima donna strutting her pulchritudinous self down a fruited runway.


serves an adventurous crowd

Ingredients

Cake


3 cups flour
4 tsp baking powder
1 tsp baking soda
dash salt
tsp cardamom
2 cups mango puree (see below)
3/4 cup almond milk (or other kind of non-dairy milk)
1/4 cup rum
2/3 cup canola oil
1 1/3 cups sugar
2 tsp vanilla

Raspberry Filling


12-oz package frozen raspberries
1/2 cup water
1/2 cup sugar
1 Tbsp lemon juice
3 Tbsp cornstarch dissolved in 1/4 cup water

Frosting


1/2 to 1 cup mango puree (see below)
1/4 cup softened Earth Balance
1/4 cup softened Tofutti cream cheese
2 cups confectioner's sugar (more as needed)
1 tsp vanilla extract
dash or so rum
raspberries and blueberries for garnish (optional)

Mango Puree (3 cups)

7 or 8 champagne mangoes
1/2 cup sugar
1/4 cup lemon juice


Process


Let's start with the puree, as you'll need it for both the cake and the frosting. 

Mango Puree


Peel the mangoes, then slice them. This is rather tricky with champagne mangoes, but you should be able to get off most of the flesh.

Put the sliced mango in a food processor. Add the sugar and lemon juice.

Puree until smooth. You may have to do this in batches.

You can make the puree ahead of time and keep it in the refrigerator, tightly covered.

Cake


Preheat oven to 350.

Oil two round cake pans.

Sift the flour, baking powder, baking soda, salt, and cardamom into a large bowl.

In another bowl, mix the mango puree, almond milk, rum, oil, sugar, and vanilla.

Tip the wet ingredients into the dry. With bold strokes, mix until batter is smooth. Don't overmix, lest you want the crumb to turn from silky to rubbery.

Pour equal amounts of batter into the two cake pans. Bake for 30-35 minutes, or until an inserted knife comes out clean. You may find a few golden crumbs clinging to your utensil. This is fine.

Let cakes cool for 10 minutes before turning them onto a wire rack.

Meanwhile, make the. . .

Filling

Pour raspberries, water, sugar, and lemon juice into a small saucepan.

Bring to a boil and simmer for 15-20 minutes, or until raspberry globules have freed themselves from the raspberry unit and mixed with all the other globules in a communal slurry.

Strain the mixture using a fine sieve. Pour the seedless communal slurry into the saucepan and return the saucepan to the stove.

Pour in the dissolved cornstarch solution and mix.

Bring the slurry back to a boil and simmer for 5 more minutes.

Remove from the heat to let it cool completely, stirring now and then. If the slurry becomes a gob of unspreadable raspberry goo, add a little water to thin it out.

When both cakes and filling are completely cool, spread the filling on one cake and place the other cake on top. We're nearly there!

Frosting


Cream vegan cream cheese and Earth Balance.

Add confectioner's sugar, whipping the two together all the while. If this takes too much coordination, alternate adding sugar and whipping.

Mix in the vanilla and rum. Take a swig of rum. You deserve it!

Stir in half a cup of mango puree. How's the consistency? Add more mango and/or confectioner's sugar as needed, tasting the frosting to make sure it's the tropical topping of your dreams.

When all is to your liking, spread the frosting along the sides and top of the cake until cake is completely covered. Only lick the spatula when you're suuuuuuuuure you're satisfied.

When the cake looks like a snowy mango bride, dot the frosting with raspberries and blueberries. Refrigerate until serving so that the frosting doesn't slump.

Notes


  • I used champagne mangoes, which are small and have a tart flavor that I like. If you go for a sweeter mango, such as Haitian or the larger, orange variety with the greenish skin, you'll probably need fewer mangoes for the puree.
  • When I made this cake, I did not believe that the frosting would be enough, and doubled the recipe (keeping the one cup of mango puree). This produced way too much. I then felt compelled to bake vegan chocolate cupcakes from Isa Chandra Moskowitz's Vegan Cupcakes Take Over the World, spread them with the frosting, and top each with a strawberry slice. Not a bad way to use any leftovers.
  • You don't NEED rum. But it's a nice addition, especially if you use the tarter mangoes.
  • It will take you at least half a day to bake and assemble this cake if you complete all the steps in one day. If you want, you can make the puree, frosting, and filling ahead of time.

Verdict


It's exhausting just to write about this cake, but it truly is worth it if you have a friend or loved one who requires some vegan cake magic. Especially nice during early spring, when everyone starts craving fruit.

"I am the mango cake monster who eats up all your time and resources. . . but everyone else will love me. Muhuhahahaha!"

Monday, July 21, 2014

Caramel Brownies

The recipe said to use drugstore caramels. Whaaaaat? The Toppled Chef would rather not bake brownies at all than use those waxy, corn syrup-laden squares that contain artificial flavor. A caramel should taste like caramel because it IS caramel, thinks the Toppled Chef. And so she created some ooey gooey drippy brownies with a panful of blood orange-infused caramel that tasted so ambrosial, it was like eating flower-strewn earth from fairyland. Bonus: the natural ingredients don't leave your esophagus feeling as if it's lined with plastic bags and your head aching with fake candy malaise.


This could serve a gaggle of adults and children.


Ingredients


Caramel


1 1/2 cups sugar
9 Tbsps salted butter, cut up into 6 pieces
3/4 cup heavy cream
1 tsp salt
Tbsp or so fresh juice from a blood orange (optional)

Brownie Batter


3 1/2 sticks butter (the other half-stick is the angel's share?)
heaping cup bittersweet chocolate chips
6 eggs
2 cups sugar
2 tsp vanilla extract
1 cup flour
pinch salt


Process


Butter (if you can stomach it) a 9 x 13 baking pan.


Caramel


Heat sugar in a medium saucepan over medium heat, stirring constantly with a rubber spatula. The sugar will clump up and turn golden-brown. Keep a close eye on it and note the moment it turns a pleasing shade of amber--the sugar will darken and calcify into a bitter mass in the blink of an eye.

Add the butter right away, being careful of spatter.

Stir the butter into the sugar until it is completely melted.

Drizzle in the heavy cream S L O W L Y, unless you want caramelized, inedible chunks of crystalized butter.

Allow the mixture to boil for one minute.

Remove from heat and stir in the salt. Squeeze in a few tablespoons of blood orange if you want. Rum would also be divine.

You can store the caramel in the refrigerator if you make it ahead of time. You may want to let it warm before using.


Brownies


Preheat the oven to 350.

Melt the butter and chocolate in a double boiler or the pan-within-a-pan-of-boiling-water used by the Tipsy Crumpet. Stir until just melted and let cool.

In a bowl, beat the eggs, sugar, and vanilla. Add the cooled chocolate mixture.

Sift the flour and salt into the chocolate mixture. Mix until well-combined.

Pour half the batter into the baking pan and spread until even.

Refrigerate for 10 minutes (you can make the caramel during this time).

Pull the brownie pan out of the refrigerator and pour the caramel on top. Depending on how gooey you want the brownies to be, you may want to use half the caramel and save the rest for later.

Refrigerate the pan for 20 more minutes to allow the caramel to set.

Pull the brownie pan out again and spread the rest of the brownie batter on top. Let the pan come to room temperature before putting in the oven.

Bake for 35 minutes, and then check for doneness.

Using the entire amount of caramel produced a fascinating oven phenomenon for me. A crackly crust emerged that was raised by a bubbling lava of caramel such that the brownie looked like a sacred tablet held aloft by a host. I baked for nearly an hour before declaring the confection done. Using less caramel may produce a more normal baking experience. When in doubt, if the caramel starts hardening and turning a darker shade of brown, it's time to pull out the pan. I promise the brownie will settle into a traditional form, although I can't promise that it will ever be tamed in spirit.

Pull the beast out of the oven and let it cool on a rack for a good long while.

You will want to refrigerate before attempting to cut these. Good luck!


Notes


  • You don't have to cut these. Spooning out brownie fluff will produce enticing caverns with caramel runoff.
  • You don't have to flavor the caramel, but orange, blood orange, rum, whiskey, and brandy would all add to the decadence.
  • A little of these go a long way. Best for a party or barbecue!

Verdict


5 stars--worth having to clean the crusty pan.


Coffee-Chocolate-Kahlua Ice Cream Pie

If the swelter of midsummer has you pining for an icy treat, pine no more! This boozy pie, with its caffeine punch and candy crackle, is like Good Humor for adults. I took Guy Fieri's coffee liqueur ice cream pie recipe and threw in some curveballs. The result is a tipsy mud pie you'll crave.


Serves 6-8. No one will eat just one slice.


Ingredients


Crust

1 box chocolate cookie wafers, crushed (I used MI-DEL's chocolate snaps)
5 Tbsp butter, melted


Pie


2 pints coffee ice cream, softened (on counter for 15 to 20 minutes)
2 pints chocolate ice cream, softened (on counter for 15 to 20 minutes)
6 Tbsp Kahlua
generous handful chocolate-covered coffee beans, crushed


Topping


1 cup heavy whipping cream
1/2 cup confectioner's sugar
1 Tbsp Kahlua
bittersweet chocolate bar for shaving
handful chocolate-covered coffee beans (optional)

Process


Preheat oven to 350 degrees.

Mix crushed chocolate cookie wafers with melted butter. Press onto bottom and up sides of a 9-inch pie pan. Bake in oven for 10 minutes. Let cool.

Combine softened ice cream and Kahlua using a mixer until creamy (you may have to do this in installments). Stir in crushed chocolate-covered coffee beans. Oh yes! Fill pie crust with ice cream mixture, cover with plastic wrap, and place in freezer for 3 to 4 hours.

Once the wait is over, whip cream with confectioner's sugar and Kahlua until soft peaks form (I do this with a hand mixer and inevitably end up spattering my walls, person, and nearby kitchen appliances with sugary foam). Top the pie with whipped cream. Refreeze for one hour.

Before serving, take a peeler and shave bittersweet chocolate over the pie. You may also top with chocolate-covered coffee beans.

Notes

  • I was afraid that freezing the whipped cream would cause it to slump into an unappetizing icy slurry. Not so! The whipped topping stayed good for days, and your pie will probably not last that long.
  • The crushed chocolate-covered coffee beans are key to elevating this pie to greatness, adding crunch and texture in concentrated bits of flavor. But you could do without in a pinch.

Verdict


5 stars plus. This will be the belle of the ball at any summer potluck. If you do what I did and serve slices garnished with mint and strawberries, prepare for those dainty embellishments to be ignored as your guests plow into the tundra.


Monday, April 21, 2014

Chocolate-Dipped Almond Macaroons

These are similar to the Grand Marnier-double chocolate macaroons except that the chocolate is a luscious hardened waterfall coating an almondy interior.


yields about 25 macaroons

Ingredients

400 grams sweetened, flaked coconut
2/3 cup sugar
3 egg whites
dash of salt
dash vanilla extract
dash almond extract
about half a cup of sliced almonds
1 cup bittersweet chocolate chips (I used Guittard)

Process

Preheat your oven to 325. Line a baking sheet or two with parchment paper.

In a food processor such as the Tipsy Crumpet's brand-new Cuisinart, blend the coconut for one minute.

Pour in the sugar. Blend for another minute.

Add the salt, vanilla, almond extract, and egg whites (I crack the whites into a bowl separately first to make sure there are no shells). Blend until combined.

Pour in the sliced almonds. Blend again.

Either empty the batter into a bowl or remove the blade from the food processor and shape the batter from there. You can scoop out the batter with an ice-cream scoop, but what's the fun in that? Using your bare hands like the Tipsy Crumpet, plop golf-ball sized mounds of batter onto the baking sheet. No need to shape them.

Bake for 10-12 minutes or, if you have a more sluggish oven than mine 15.

Remove and keep in the pan for 10 minutes, then cool on a wire rack.

When the macaroons are fully cool, obtain a double boiler or use the Tipsy Crumpet's smaller-pan-in-a-larger-pan-of-heated-water trick. Pour in the chocolate chips and melt. Arrange the macaroons on a piece of waxed paper. Spoon melted chocolate lavishly over half of each macaroon. Or drizzle the chocolate in ribbons. Either way, use up all the chocolate. You can store the macaroons in the refrigerator if you want, but the chocolate will harden eventually either way.

Notes

  • Remember, unsweetened chocolate; sweetened coconut.
  • These macaroons turned out nicely, but they would have been even nicer with a dash of amaretto or Frangelico.
  • They would also have been better with a half-cup or so of marzipan. Next year.
  • You could forego chocolate and grate in some lemon or orange zest instead. Adding some white chocolate chips to the batter would give your desserts an Eastery decadence.


Verdict

3.5 stars. Not bad, but missing some substance. Trying these with the variations in the Notes section would make the macaroons ambrosial.

Sunday, April 20, 2014

Grand Marnier-Double Chocolate Macaroons

These are Smitten Kitchen's dark chocolate macaroons with one important exception: they contain booze. Grand Marnier was what I had on hand, but rum would have done just as well. You can see some non-chocolate stragglers here: we'll get to those in another blog post. In the meantime, these are soft, fudgy, and even more brownie-like than a brownie itself. You will never crack open a carton of Manischewitz again!


yields about 25 macaroons

Ingredients

4 oz unsweetened chocolate
400 grams sweetened, flaked coconut
2/3 cup sugar
6 Tbsp cocoa powder
3 egg whites
dash of salt
dash vanilla extract
prolonged glug of Grand Marnier or another spirit

Process

Preheat your oven to 325. Line a baking sheet or two with parchment paper.

In a double boiler or the Tipsy Crumpet's very own pan-in-a-bigger-pan-of-heated-water, melt half of the chocolate (two ounces). Break up the other half. When the first half is melted, remove the pan from the heat and stir in the other half. It will soften like the dulcet tones of a wood thrush.

In a food processor like the Tipsy Crumpet's brand-new Cuisinart, blend the coconut for one minute.

Pour in the sugar and cocoa powder (no need for sifting). Blend for another minute. This will look really cool as you'll see the white and black layers, separate at first, mix into one. The chocolate macaroon: a metaphor for racial harmony!

Add the salt, vanilla, Grand Marnier or other spirits, and egg whites (I crack the whites into a bowl separately first to make sure there are no shells). Blend until combined.

Pour in the chocolate. Scrape the pan to get as much out as you can. When the river of chocolate has flooded the craggy mound of coconut goo, blend again.

Either empty the batter into a bowl or remove the blade from the food processor and shape the batter from there. You can scoop out the batter with an ice-cream scoop, but what's the fun in that? Using your bare hands like the Tipsy Crumpet, plop golf-ball sized mounds of batter onto the baking sheet. No need to shape them.

Bake for 10-12 minutes or, if you have a more sluggish oven than mine 15.

Remove and keep in the pan for 10 minutes, then cool on a wire rack.

Notes

  • Remember, unsweetened chocolate; sweetened coconut.
  • It would be delightful to grate an orange peel into this.
  • Rum would be just as good as Grand Marnier. So would whiskey.
  • You could add some sliced almonds and almond extract for chocolate-almond macaroons.


Verdict

5 stars. I would make these even if it weren't Passover, and I don't even like coconut.

Tuesday, April 15, 2014

Triple Chocolate Passover Brownies

Passover brownies! These aren't your sickly sweet squares from a Manischewitz box. They're moist, dense as earth, and sophisticated. Loaded with unsweetened chocolate, bittersweet chocolate chips, and cocoa powder, they'll have you swearing off macaroons for a long time to come. I based the recipe on Engel's Passover Brownies, but with a few Toppled Chef twists.


makes 32 brownies

for a 9 x 13 baking pan: The Tipsy Crumpet doesn't bake brownies for just herself.

Ingredients


4 oz unsweetened chocolate
2 sticks butter (1 cup)
4 eggs
2 cups sugar
1 tsp vanilla
dash of rum 3 Tbsp sour cream or Tofutti substitute
1/3 cup and 1 Tbsp unsweetened cocoa powder
1 cup Passover cake meal
pinch salt
1 cup bittersweet chocolate chips

Process


Preheat the oven to 325.

Butter a 9 x 13 baking pan.

Obtain a double boiler or make one by filling a pan one-third of the way with water, heating the water, and setting a small pan on top.

With your double boiler nice and hot, melt the butter and chocolate, stirring occasionally. I like to wait until there are only a few lumps left and remove the mixture from the heat. Don't these two ingredients get along well together? Your kitchen smells intoxicating.

Remove your nose from the chocolate-butter elixir and obtain a large bowl. Crack the eggs in the bowl, check for shell shards, muddle the eggs a bit with a fork, add the sugar, and mix until these ingredients are getting along in the creamiest fashion. (Note: I don't like to beat the eggs and sugar using an electric mixer until they're pale because I find that this makes the brownies less gorgeously dense and more light and chewy. Just my preference.)

Add the vanilla and rum and stir in the molten ecstasy you created with the double boiler. It doesn't have to be room temperature, but it shouldn't be too hot. You don't want scrambled eggs in your batter. Stir in the sour cream. You may have to whisk it so that it yields to its surroundings and dissolves.

In another bowl, sift the cocoa powder, cake meal, and salt.  Carefully stir these into the wet mixture.

Make it rain chocolate chips into the bowl. Give a few more cautious stirs.

Pour the batter into your pan.

Bake for about 35 minutes and cool before cutting on a wire rack or just your stove.

Notes

  • You can add a swirl of raspberry jam after you've poured the batter into the pan. You can also add dried cherries or walnuts or, for even more sophistication, blackberry jam. To add a jam swirl, pile a hefty amount onto a knife and swirl the knife through the batter. You may repeat a few times, with a clean knife each time.
  • Be prepared for non-kosher-keeping people--even non-Jewish people--to widen their eyes upon tasting these brownies and lunge for more.
  • You can put in more than a cup of chocolate chips.
  • some espresso powder might be nice--maybe a Tbsp mixed into the sour cream


Verdict


5 stars. I've made this for my colleagues three years in a row, and it's a huge success each time. It's probably why I'm still employed.